Resetting Supermicro IPMI Password
09 April 2024 -
Reads: 2093
Last Updated: 09 April 2024
IPMI Reset Process
 The IPMI will boot as soon as the motherboard receives power. Depending on the power settings within the BIOS, the main system may remain powered off.
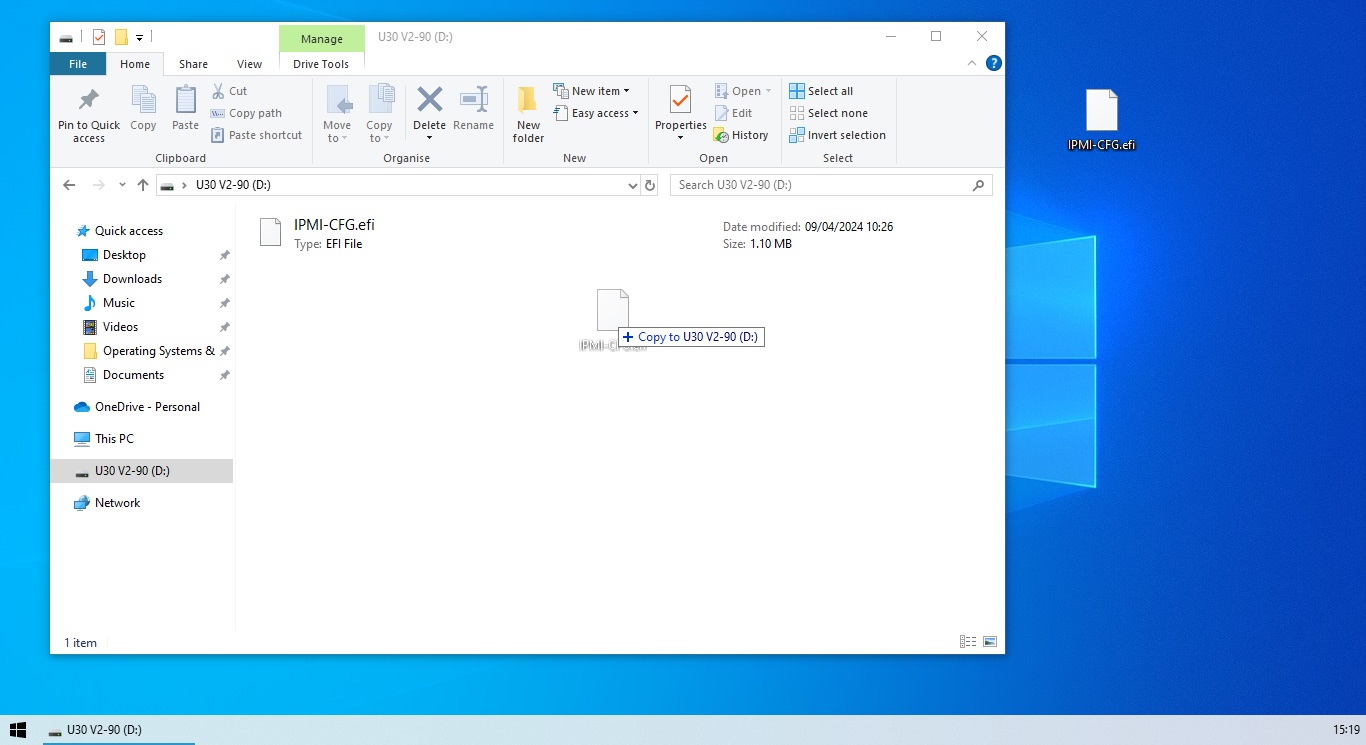
Plug in a keyboard and monitor to the rear connections, along with the USB device that now has the .efi file copied over. Power on the system and hold "F11" key during P.O.S.T.
The IPMI will boot as soon as the motherboard receives power. Depending on the power settings within the BIOS, the main system may remain powered off.
Plug in a keyboard and monitor to the rear connections, along with the USB device that now has the .efi file copied over. Power on the system and hold "F11" key during P.O.S.T.
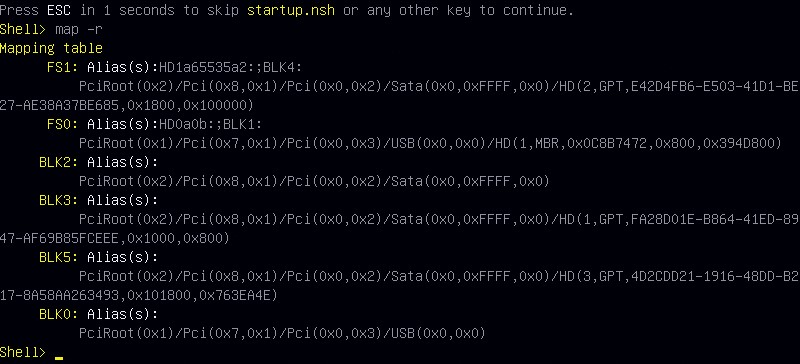
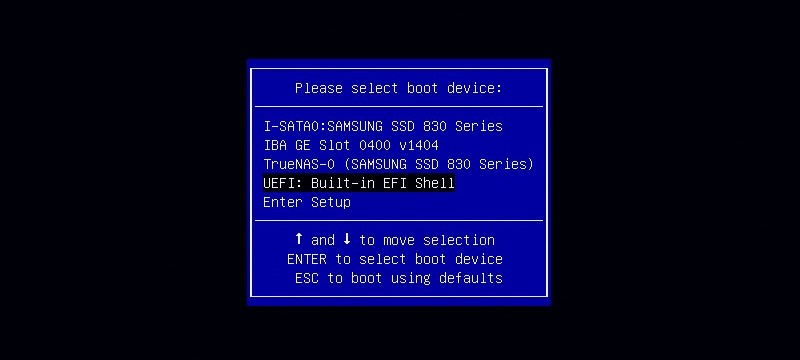 From the boot menu, select the "UEFI - Built-in EFI Shell" option using the arrow keys followed by "enter". You will be presented with the CLI. Upon loading It will automatically map all of the connected devices.
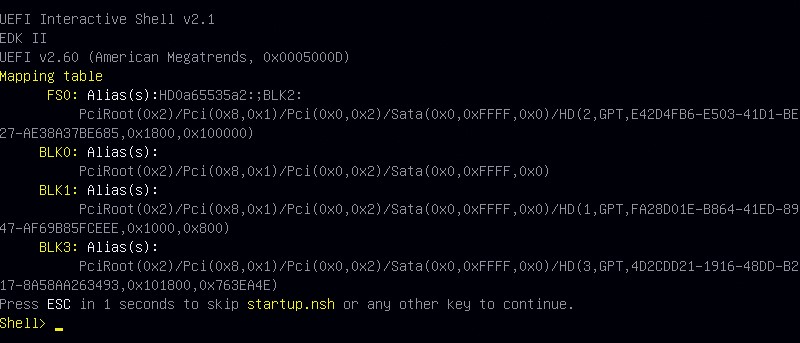 The external USB device will automatically "map" as "FS0:".
In the shell, type "FS0:" followed by the "enter" key, to access the attached external storage device.
 To run the efi tool, simply, type: "IPMI-CFG.efi" using the switch (-) followed by: "fd". Press the "enter" key to execute the command.
IPMI-CFG.efi -fd
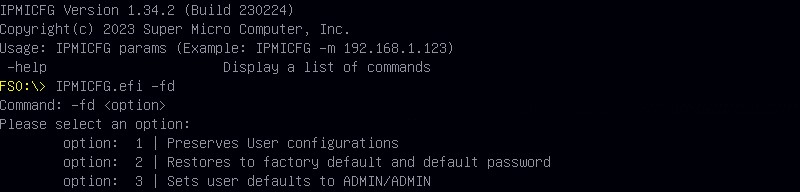 The tool will state, that it needs to be run again. Only this time it will show three options 1, 2 or 3. We went with option 3. As we purchased the motherboard for testing from an online auction, meaning that we had no idea what credentials the were.
IPMI-CFG.efi -fd 1
IPMI-CFG.efi -fd 2
IPMI-CFG.efi -fd 3

You will see that the feedback message states that the IPMI has been been reset successfully.
You can login to the IPMI management console, via the web interface. Using the default username and password set by the EFI tool.
To exit the EFI-Shell. Simply type, "exit" depending on your model or firmware version of Supermicro motherboard. You'll either end up back at the boot option menu,
for you to select your start up disk or enter the BIOS setup. Or the motherboard will restart and boot into the default option. However upon rebooting, Pressing the "delete" key will enter the BIOS.
Where you can changes the IPMI's IP settings.
If you know the IP address of the IMPI, you can go ahead and login using ADMIN / ADMIN from a web browser. Or via the BIOS > IPMI > BMC settings, you can enter a static IP address or enable DHCP, which if connected to a router, will assign an IP address to the IPMI interface.
You can look in your routers IP table to see what IP address was assigned. Or during start up, along the bottom of the video output, it will show the IP address of the BMC.
From within the BIOS, using the left and right arrow keys, move along to the "IPMI" tab, then down to the "BMC Network Configuration" pressing the "enter" key to select.
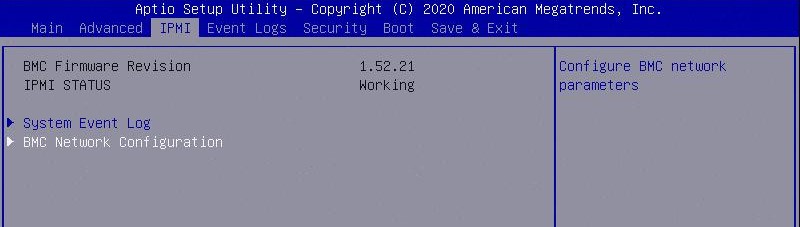 Within the BMC Configuration, select the first option "Update IPMI LAN Configuration" Select "YES" in the dialog box.
 This will allow you set a static IP address, we set it to: 192.168.0.11
 Upon pressing "F4" to save and exit setup, the system will restart, showing the newly set BMC IP along the bottom of the display output while posting.
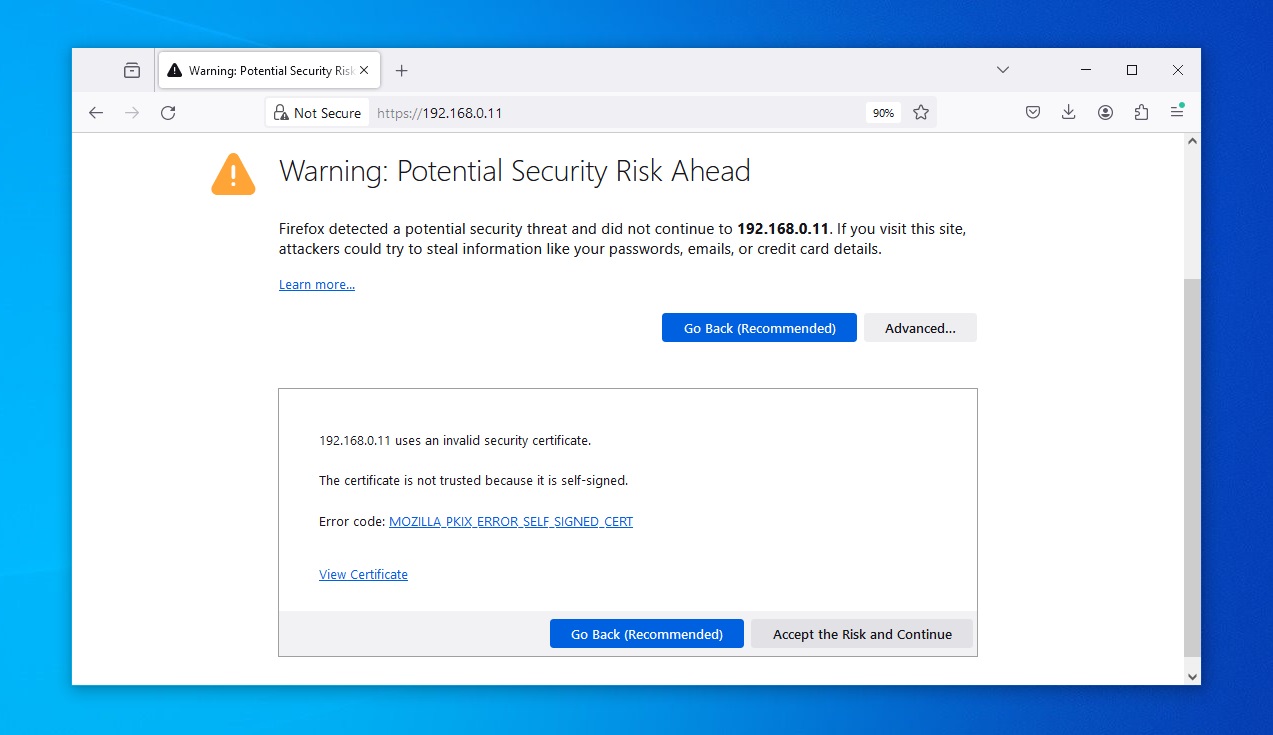
When IPMI IP address is established for the first time, your browser won't trust the connection. As the connection is on your local network, it is safe to
select the "Advanced" followed by "Accept the risk and continue". Future local connections to this IP address will be trusted unless the IPMI's address changes. Prompting the new local connection to be trusted again.
Upon pressing "F4" to save and exit setup, the system will restart, showing the newly set BMC IP along the bottom of the display output while posting.
When IPMI IP address is established for the first time, your browser won't trust the connection. As the connection is on your local network, it is safe to
select the "Advanced" followed by "Accept the risk and continue". Future local connections to this IP address will be trusted unless the IPMI's address changes. Prompting the new local connection to be trusted again.
We are using FireFox: v123.0.1
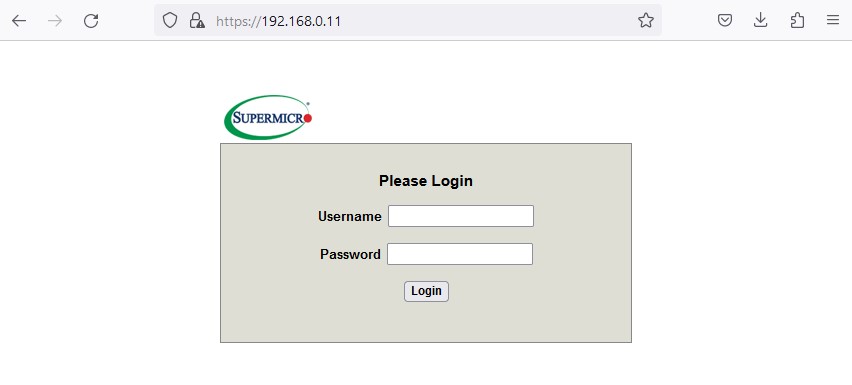
 The Supermicro IPMI login page will proceed to load. You can now try the default credentials.
followed by the login button.
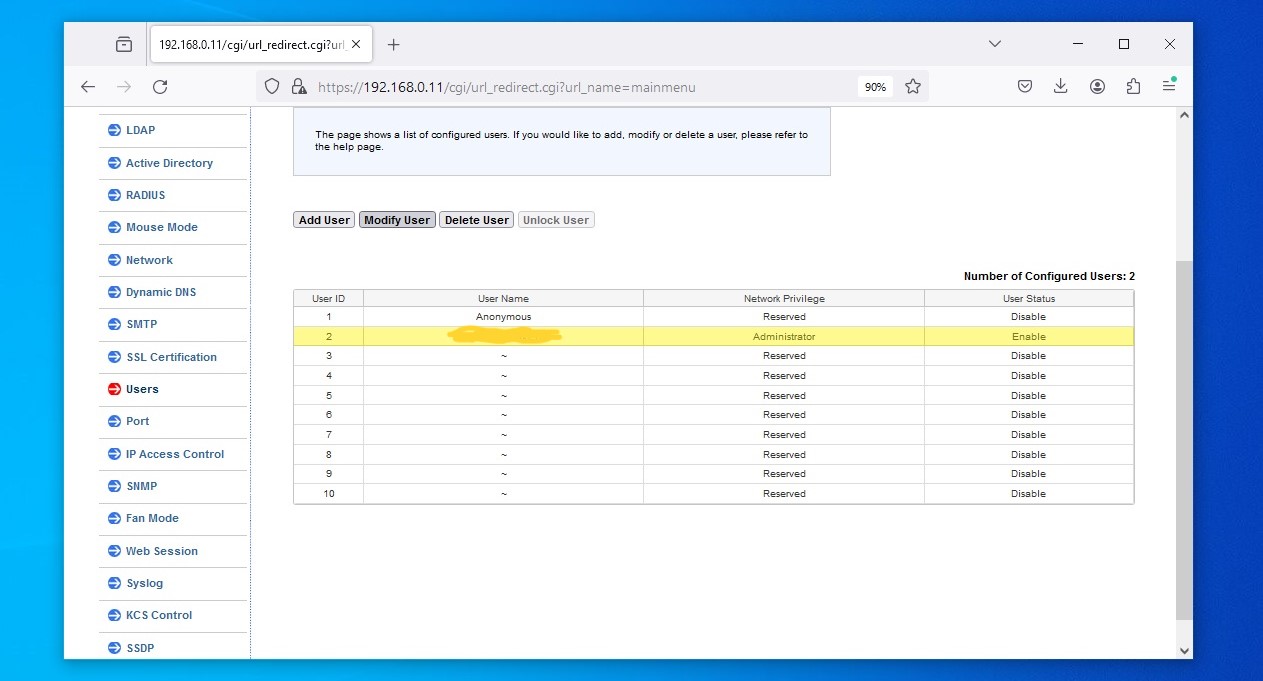
 Once logged in to the IPMI, head to the "configuration" tab and select the "users" link in the drop down.
You should now modify the ADMIN account name and password.
Select the line, it will highlight in yellow, and click on modify button above.
Upon setting a new user name and password. Make sure to take note of the new details!
It's best to logout then back in to test that the new credentials are working as expected.
Once logged in to the IPMI, head to the "configuration" tab and select the "users" link in the drop down.
You should now modify the ADMIN account name and password.
Select the line, it will highlight in yellow, and click on modify button above.
Upon setting a new user name and password. Make sure to take note of the new details!
It's best to logout then back in to test that the new credentials are working as expected.
 If this process didn't work for you, please use the link below to get in touch. We will do our best to get this sorted out together. Ensuring that everyone
who may come across this article, is reading the best possible information. Also, let us know if you spot any errors throughout the article.
If this process didn't work for you, please use the link below to get in touch. We will do our best to get this sorted out together. Ensuring that everyone
who may come across this article, is reading the best possible information. Also, let us know if you spot any errors throughout the article.
Tested on this hardware & firmware
SuperMicro H11SSL-i (Board Revision: 2.00)
BIOS v2.1 - IPMI: v01.52.21 - Shell: v2.1
- IPMI-CFG.efi v1.34.2 & v2.00.0
SuperMicro H11SSL-i (Board Revision: 2.00)
BIOS v2.1 - IPMI: v01.52.21 - Shell: v2.1
- IPMI-CFG.efi v1.34.2 & v2.00.0
Post Terminology
B.I.O.S - Basic.Input.Output.System
P.O.S.T - Power.On.Self.Test
D.H.C.P - Dynamic.Host.Configuration.Protocol
I.P Address - Internet Protocol Address
Dynamic - Assigned and managed by the router
Static - Manually set, doesn't change
I.P.M.I - Intelligent Platform Management Interface
BMC - Baseboard Management Controller
C.L.I - Command Line Interface
LAN - Local Aera Network
EFI - Extensible Firmware Interface
UEFI - Unified Extensible Firmware Interface
Protocol - A standardised set of rules for formatting and processing data. Protocols are needed to allow computers to communicate with one another.
USB - Universal Serial Bus
File System - Is for organising and storing data on devices like hard drives, and flash drives. It manages how files are stored, named, accessed, and placed on the storage medium. Structured around directories to organise files and metadata. Such as: file names, timestamps, permissions. Different file systems have different features and limitations.
FAT32 - File Allocation Table 32. Is used for organising and managing files on storage devices like hard drives, USB flash drives, and memory cards.
GUI - Graphical User Interface.
Interface - What you see and interact with while using an electronic device.